Crofter985'S KLX650C supermoto build
-
Crofter985

- Posts: 240
- Joined: Mon Nov 10, 2014 6:47 pm
- Location: Shetland Islands, UK
Re: Crofter985'S KLX650C supermoto build
Wow, I've found an Australian company selling the electronic hardware for $1000au that's cheap. It comes with the software too. It's got loads of info on how to make the flywheel too.
-
Sandblaster

- Posts: 6313
- Joined: Thu Jun 07, 2012 3:50 pm
- Location: Eugene, OR
- Contact:
Re: Crofter985'S KLX650C supermoto build
I couldn't give two hoots about mixing topics like they do at some forums.... we go where the discussion takes us 
In this case I am really intrigued by the possibility of building a low cost dyno.
So here is a link to the new discussion.
viewtopic.php?f=5&t=890
In this case I am really intrigued by the possibility of building a low cost dyno.
So here is a link to the new discussion.
viewtopic.php?f=5&t=890
If bikes are for kids I'll never grow up.
-
Sandblaster
- Posts: 6313
- Joined: Thu Jun 07, 2012 3:50 pm
- Location: Eugene, OR
- Contact:
Re: Crofter985'S KLX650C supermoto build
Can you post a link to it?Crofter985 wrote:Wow, I've found an Australian company selling the electronic hardware for $1000au that's cheap. It comes with the software too. It's got loads of info on how to make the flywheel too.
If bikes are for kids I'll never grow up.
-
Crofter985
- Posts: 240
- Joined: Mon Nov 10, 2014 6:47 pm
- Location: Shetland Islands, UK
Re: Crofter985'S KLX650C supermoto build
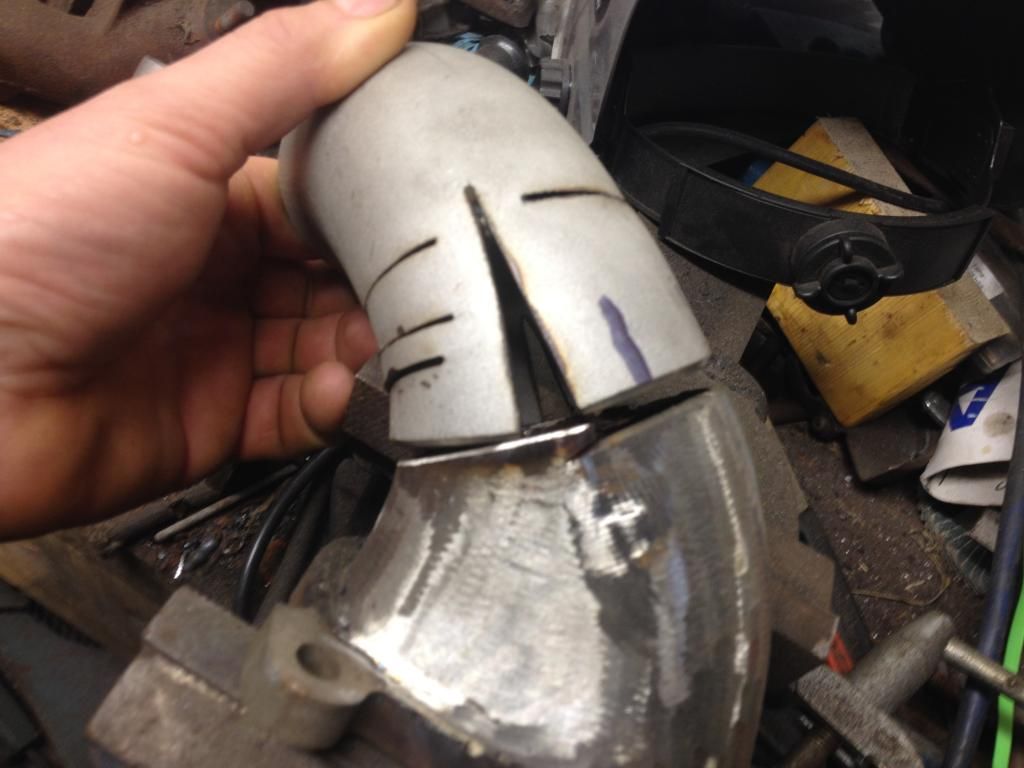
While I'm waiting for a different blade to arrive for my table saw, one for non ferrous metals so I can cut some alloy sheet to enclose the subframe. I started thinking about the exhaust, I had been thinking to go to the side with the exhaust starting off with a 90 bend but it was going to make it difficult to get the nuts or bolts or whatever was going to be used to fix the exhaust on, on to the inside side of the turbo housing. I'd thought of a few different ways to do it mostly by taking one 2" 90 bend then cutting it in half long ways and making flat tapered pieces to fill in the gaps. Then it occurred to me to go up with a 45 bend first then across with a 90. It would look neater and keep the exhaust away from the front tyre when the suspension is under full compression.
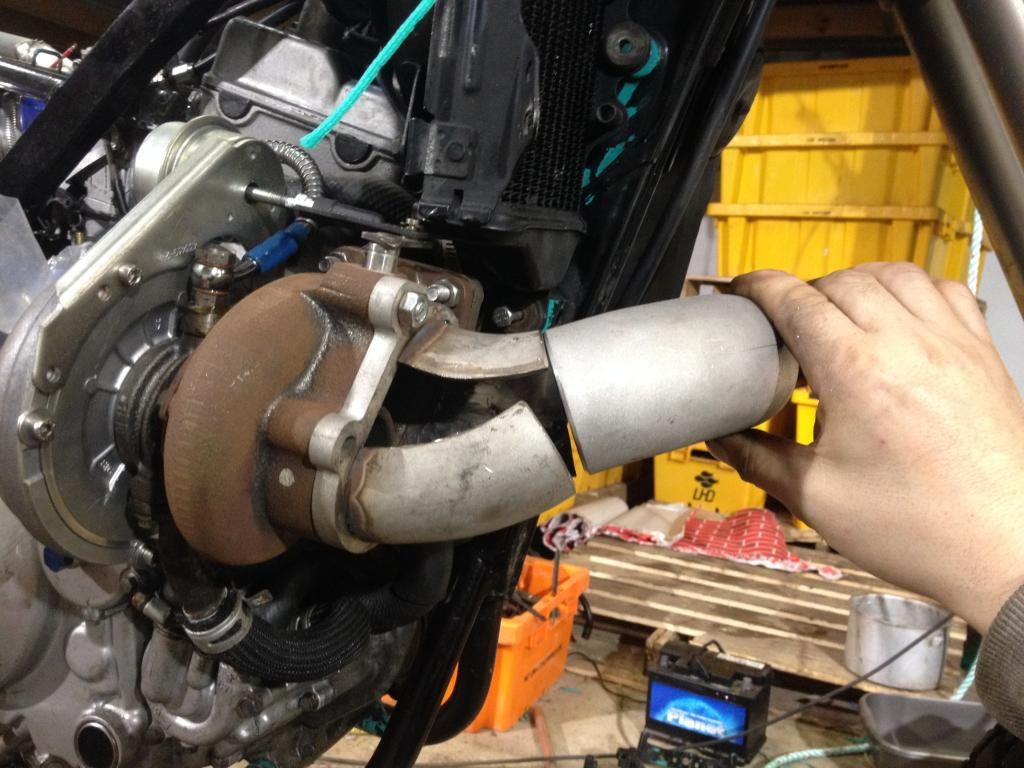
So I cut each side of the 45 with a grinder with a thin blade, the flange is just slightly narrower than the 2" bend so I squashed the two parts of the 45 bend at one end in the vice, then tacked on the outside them on to secure them when I got it all tacked on I welded them continuously on the inside. Then I started filling the gaps with small pieces of stainless plate.
I see I must have moved a bit when I took that pic. then when I got both sides filled up and the inside welded up I ground out all the roots on the outside and welded them continuously I had to do this to give most room for the nuts that will hold it to the turbine housing. I then ground back all the welds again to make max room. The next bit of bend I will make slits in it to spread it a little to make a smooth transition from one part to the next.

So I cut each side of the 45 with a grinder with a thin blade, the flange is just slightly narrower than the 2" bend so I squashed the two parts of the 45 bend at one end in the vice, then tacked on the outside them on to secure them when I got it all tacked on I welded them continuously on the inside. Then I started filling the gaps with small pieces of stainless plate.

I see I must have moved a bit when I took that pic.
-
Sandblaster
- Posts: 6313
- Joined: Thu Jun 07, 2012 3:50 pm
- Location: Eugene, OR
- Contact:
Re: Crofter985'S KLX650C supermoto build
You certainly have some skills my friend.
Thanks for the updates....
I'm patiently waiting for a ride report
Thanks for the updates....
I'm patiently waiting for a ride report
If bikes are for kids I'll never grow up.
-
Crofter985
- Posts: 240
- Joined: Mon Nov 10, 2014 6:47 pm
- Location: Shetland Islands, UK
Re: Crofter985'S KLX650C supermoto build
I wish, I can do a lot of things but none of them well I'm afraid. If I was good at welding I wouldn't need to grind it. I'm thinking along the lines of sand blasting the exhaust to get a uniform finish, something anyway. Btw I got a packet of 1.6mm welding rods for this job and it's sch10 bends (around 2mm wall) so there's not so much problem with melting holes but when the arc strikes you have to go like hell and the rod shakes like crazy if yr hand isn't steady. It's not easy, it needs lots of practice.
-
Sandblaster
- Posts: 6313
- Joined: Thu Jun 07, 2012 3:50 pm
- Location: Eugene, OR
- Contact:
Re: Crofter985'S KLX650C supermoto build
If when your done and it holds.... What more do you need?
I can't weld for beans...
Oh sure I get lucky and get a good bead once in a while but most of the time I'm pathetic.
I'm thinking about sending my Son through some night welding classes at the local College...
Perhaps he has a steady enough hand and can learn how...
Not me
I can't weld for beans...
Oh sure I get lucky and get a good bead once in a while but most of the time I'm pathetic.
I'm thinking about sending my Son through some night welding classes at the local College...
Perhaps he has a steady enough hand and can learn how...
Not me
If bikes are for kids I'll never grow up.
-
Crofter985
- Posts: 240
- Joined: Mon Nov 10, 2014 6:47 pm
- Location: Shetland Islands, UK
Re: Crofter985'S KLX650C supermoto build
I'm looking forward to the ride report too.  watch this space
-
Crofter985
- Posts: 240
- Joined: Mon Nov 10, 2014 6:47 pm
- Location: Shetland Islands, UK
Re: Crofter985'S KLX650C supermoto build
I'm having a good think about this subframe. I roughly measured it and calculated the total volume,12litres I get.
That's good, that was an answer in the correct range. I should be able to get the 4 litres min I need to get a big enough plenum and lots of room to spare. This is the pump for the water/meth kit.
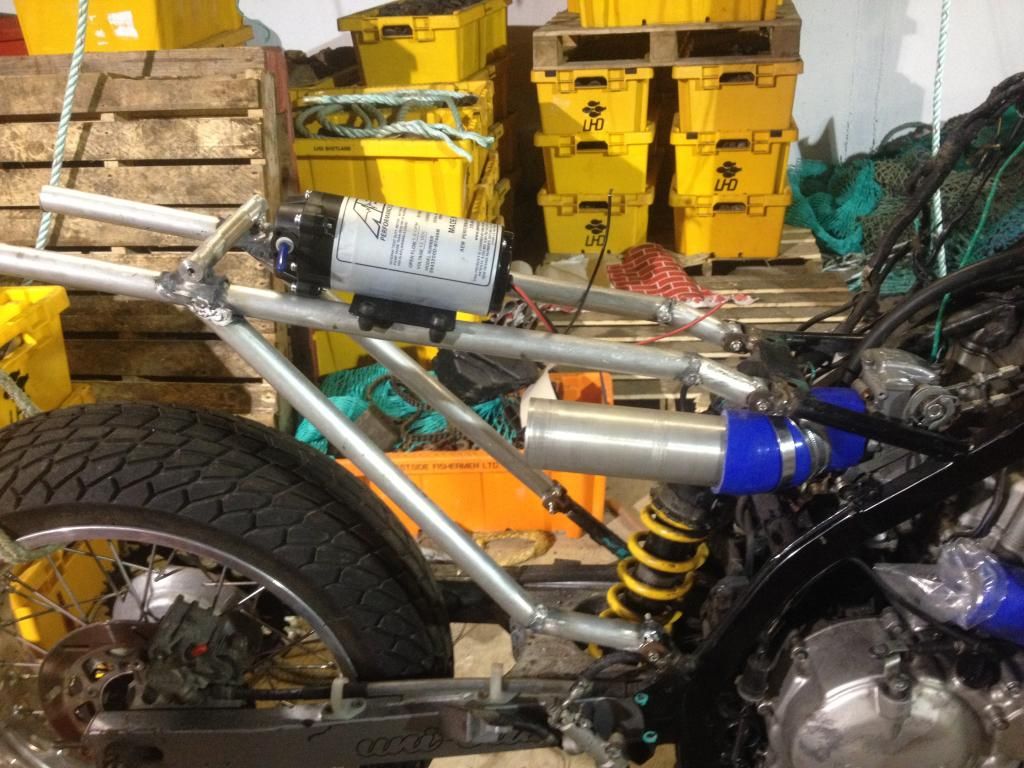
It's really a monster, far bigger than needed, it must be twice the volume of the starter, but it will not be running to much of its capacity so I'm hoping I don't have any issues with the provision of power to it. I am considering putting the pump in the bottom of the subframe and building the plenum above it, perhaps with access from the rear? Could that work? One of the considerations for the pump is that the pump has to be below the tank and below the jet so that would work, maybe? I've ordered two chain guide rollers, one to stop the chain hitting up into the alloy of the subframe and the other to stop sideways lash into the subframe. At the moment the chain rubs the side of the tyre, I expected it would with the 5" rim at the back but I wanted that 160 section hoop on the back so that's how it goes. I'm going to space off the front and rear sprockets to sort that out, 5mm should do.
There's also the electrics that need housed somewhere and the battery but I'm fairly positive now it will all work out.
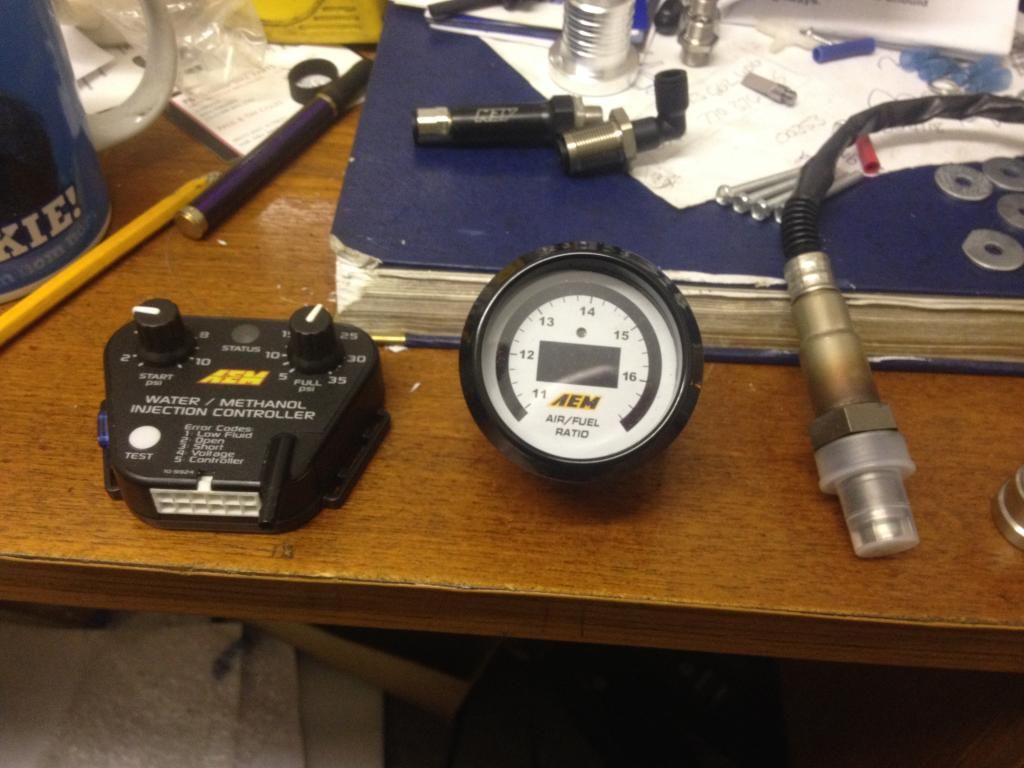
That's the controller for the water/meth kit, it's reasonably small so I should get that hidden away somewhere, under the seat most likly, along with the CDI and the regulator and the loom. I was reading a KLX 650 specific forum on another site and someone mentioned a programmable CDI unit for the KLX so I searched it on internet, a company called ignitech.cz in chezcoslovakia, you can hook it up to a PC and programme the ignition curve AND it's boost reference-able, I had looked at dynatec ignitions and contacted them but they only had make specific units and the KLX was not covered, they do however make a uprated coil for CDI units so that's a possibility, anyway that ignitech unit sounded good so I ordered one.
One kind of drawback with fitting that programmable ignition is it opens up the possibility of lots of boost, "is that a problem" I hear you say, well I was kinda thinking 70hp was my target, I think the engine will cope with that not too bad but I think if I go much over that the crank will sh!t it's self, I have been told by those who know, that's the weak point of a boosted big single. One thing that would proof the engine for a couple more bhp would be welding the crank, not now though (famous last words) I really want to get this running even at low boost levels, I can refine it from there.
One more thing in the last pic, a A/F sensor, oxygen sensor or lambda sensor and gauge, a essential bit if kit for carb tuning and prevention of engine melting.
-
Crofter985
- Posts: 240
- Joined: Mon Nov 10, 2014 6:47 pm
- Location: Shetland Islands, UK
Re: Crofter985'S KLX650C supermoto build
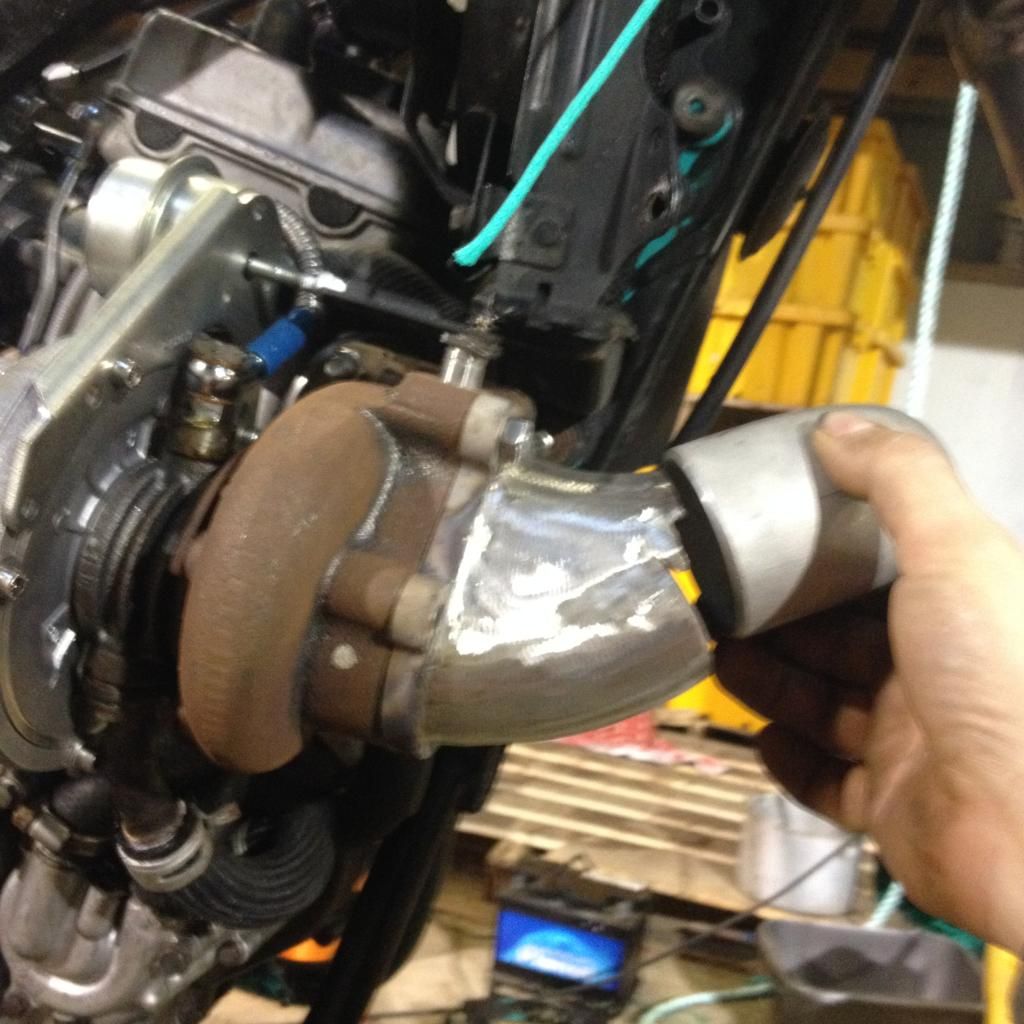
Still messing around with the exhaust, got an hour or so to work with it so I got on with it.
Here I slit and notched the 90 bend to spread the end to match in with the section of exhaust already fabricated.
I then tidied up the end of the 90 bend and as you can see in the first picture I have already tided up the end of the first bit I've welded up.
That's it stuck on and the slits filled up with some flatbar cut into V shapes and the notches welded up I've started to clean it up with the grinder, then it gets a bit of flap disc then power file where I can't get the flap disc. Hopefully it will look presentable when I'm finished. I know full well it's not the best for strength if I grind down the welds but it would not be cool to leave it. I don't do much welding and mostly when I do I'm just getting into the swing of things and laying down a decent bead when I'm finishing the job/project, but there you go.
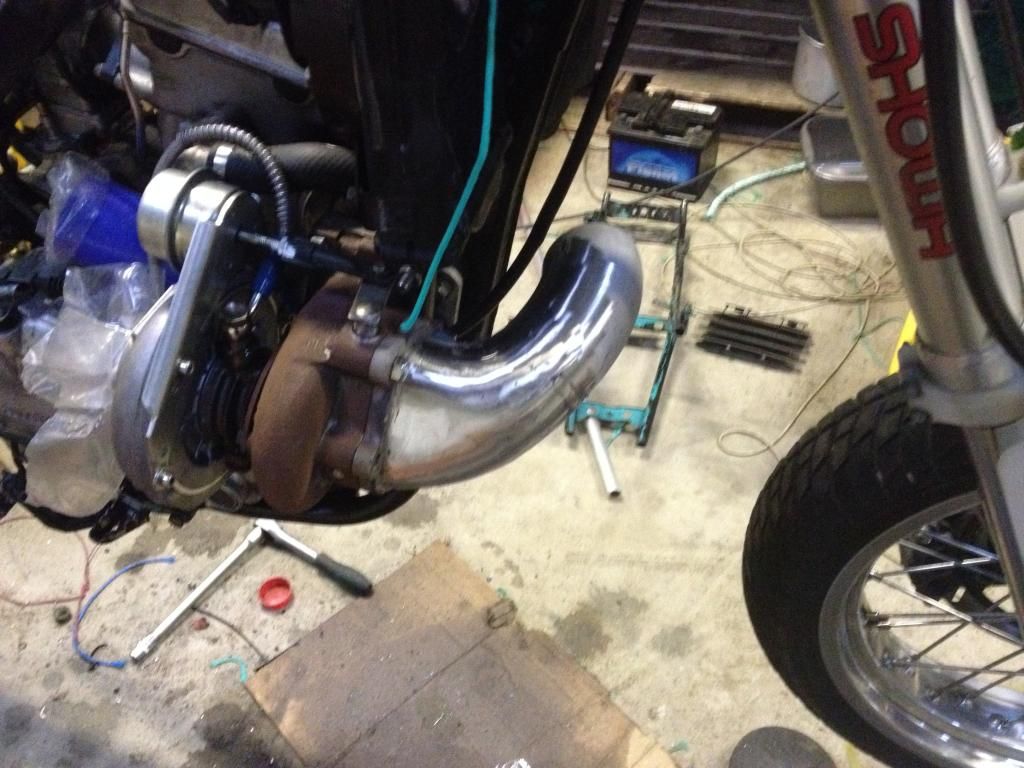
Another view of where I'm going.
There will be another 90 bend going on to turn the exhaust down the front of the frame then I am looking at a few different options for a silencer, but I think it will be a aftermarket universal back box for a car, an oval one with a offset exit so I can terminate just behind the righthand foot peg.
Here I slit and notched the 90 bend to spread the end to match in with the section of exhaust already fabricated.

I then tidied up the end of the 90 bend and as you can see in the first picture I have already tided up the end of the first bit I've welded up.
That's it stuck on and the slits filled up with some flatbar cut into V shapes and the notches welded up I've started to clean it up with the grinder, then it gets a bit of flap disc then power file where I can't get the flap disc. Hopefully it will look presentable when I'm finished. I know full well it's not the best for strength if I grind down the welds but it would not be cool to leave it. I don't do much welding and mostly when I do I'm just getting into the swing of things and laying down a decent bead when I'm finishing the job/project, but there you go.

Another view of where I'm going.

There will be another 90 bend going on to turn the exhaust down the front of the frame then I am looking at a few different options for a silencer, but I think it will be a aftermarket universal back box for a car, an oval one with a offset exit so I can terminate just behind the righthand foot peg.
Who is online
Users browsing this forum: No registered users and 6 guests